Search icon
Search icon

How to Create a Stunning Kitchen Backsplash with Tiles

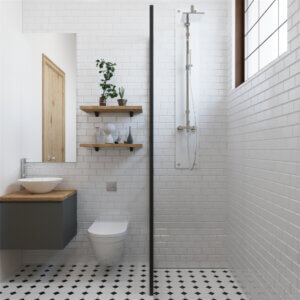
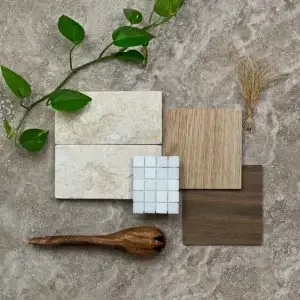
The kitchen backsplash serves as a focal point and an opportunity to infuse style and personality into your kitchen design. When chosen thoughtfully, tiles can transform an ordinary backsplash into a stunning visual masterpiece. In this blog, we will guide you through the process of creating a captivating kitchen backsplash using tiles. From selecting the right tiles to installation tips, let’s explore how you can elevate the heart of your home with a stunning tile backsplash.

  1. Plan and Prepare: Before diving into the tile selection process, start by planning and preparing your kitchen backsplash project. Take measurements of the area you want to cover and consider the overall design and color scheme of your kitchen. Determine your budget and research different tile options that align with your vision.
  2. Choose the Perfect Tiles: Selecting the right tiles is crucial to achieve a stunning kitchen backsplash. Consider factors such as durability, ease of maintenance, and the desired aesthetic. Popular choices include ceramic, porcelain, glass, and natural stone tiles. Explore various shapes, sizes, colors, and finishes to find the perfect fit for your kitchen.
  3. Coordinate Colors and Patterns: Harmonize the backsplash with your kitchen’s overall color scheme and style. Opt for tiles that complement or contrast with your countertops, cabinets, and wall colors. Experiment with different patterns such as subway, herringbone, or mosaic designs to add visual interest and depth to the backsplash.
  4. Create a Layout: Plan the layout of your tile backsplash before installation. Use tile spacers to achieve consistent spacing between tiles and ensure a professional finish. Consider creating a tile pattern or focal point within the backsplash area for added visual impact.
  5. Gather the Right Tools and Materials: To ensure a smooth installation process, gather the necessary tools and materials. These may include tile adhesive, trowels, tile spacers, a tile cutter, a level, grout, and a sponge. Ensure you have everything you need before starting the installation.
  6. Prepare the Surface: Ensure the wall surface is clean, dry, and free from debris. Remove any existing backsplash materials, such as wallpaper or old tiles, and repair any damaged areas. A smooth and even surface will provide a solid foundation for the tile installation.
  7. Install the Tiles: Apply tile adhesive to the wall using a trowel, working in small sections at a time. Press the tiles firmly into the adhesive, aligning them with the layout you planned. Use a level to ensure the tiles are straight and even. Continue this process until the entire backsplash area is covered.
  8. Grout and Finish: Once the tiles have set, apply grout to the gaps between the tiles using a grout float. Remove excess grout with a sponge and water, carefully cleaning the tile surfaces without disturbing the newly applied grout. Allow the grout to cure as per the manufacturer’s instructions.
  9. Seal and Maintain: To protect your beautiful backsplash and ensure its longevity, consider applying a sealant to the grout lines. This will help prevent staining and make cleaning easier. Follow the manufacturer’s instructions for proper sealant application and maintenance guidelines.

Conclusion: Creating a stunning kitchen backsplash with tiles is a rewarding project that can significantly enhance the aesthetics of your kitchen. By carefully selecting the right tiles, coordinating colors and patterns, and following proper installation techniques, you can transform your kitchen into a captivating space. Enjoy the process, unleash your creativity, and watch as your kitchen comes to life with a beautiful tile backsplash that reflects your personal style.

Let's kickstart the planning phase for your dream home project!

Already have something in mind?

Have a question and can't find an anwser?

Get in touch, we're pretty quick to respond.